
Due to complication around the functionality and existing bugs we are not providing the stand alone functionality to schools, Any school that we must onboard due to any contractual obligation must be licensed as timetabled interviews which means school must be given the license to Timeable module and as long they upload their data to etz file and generate classlist then EI will work as the rest of timeabled schools.
Preamble
This user-guide will cover the event setup for schools that do not have timetable file and instead using our stand-alone Interview module.
Step 1 - Set up and manage event
Schools that are using our stand-alone interview module will require to import their data from the external source in order to create the event. The data that is required is teachers, rooms, students, classes and parents information. The Upload step will guide users on how to use our data template and import data. Schools will be issued with login webcode during the onboarding stage to login to the module. Please go to my.edval.education and login with your webcode issued by Licensing Team. If your school is interested into our single sign on (SSO) functionality please refer here.
For stand-alone Interview schools the only step that would be different to non stand-alone school is the uploading of data, the rest of the steps would be the same as how all our schools would be setting up interview events. Upon logging in to my.edval.education, user will be landed to the main event page. In order to create the event please click on "Create event" at the right side panel. This will load up the upload screen that will take user through all steps and data types.
1. Upload
- It is very important to use the template available in Upload screen, this will ensure that user using the correct format.
- Please click on the format hyperlink, this will display the overview of template. Click on Download template at the bottom of screen to download the template. This will download a Import_Event_Data.xlsx Excel workbook into your PC folder. Once you open the workbook you will notice that the data type is divided into 5 worksheets located in each tab. Please make sure you delete the sample data within each worksheet before importing your data in it.Each worksheet will contain the following column headings:Data Type - Each worksheetColumn AColumn BColumn CColumn DColumn EColumn FColumn G
Column H teachersTEACHERCODETEACHERNAME (Optional)EMAIL (Optional)ROOM (Optional)studentsSTUDENTCODESTUDENTNAME (Optional)YEARLEVELPARENTCODEPARENTCODE2parentsPARENTCODEPARENTNAME (Optional)EMAIL (Optional)PHONE (Optional)ADDRESS (Optional)SUBURB (Optional)STATE (Optional)POSTCODE (Optional) membershipSTUDENTCODECLASSCODEclassesCLASSCODETEACHERCODESUBJECT (Optional)

- All heading titles must match the Tes required format with the exact heading. Please ensure that there are no additional spaces at the end of each column heading as this will prevent the import from working.
- For the file to be uploaded successfully, every column header must be included, even if the corresponding column contains no data.
- Check that the .xlsx file contains correct data formatting. Excel sometimes converts numeric data to exponential formats, or codes to date format for example, which must be manually fixed prior to upload.
- Once you have entered your data into each worksheet, please go ahead upload the file by clicking on upload "+" sign. Locate the file and click Open. Once the file has been imported please click on "Upload all files", This will process the import and once completed it will display the progress bar along with number of errors/warning if any. Click on Next to go to Edit screen to validate your data.
2. Edit and Validation Checks
When uploading family data, the system will run some validation checks on your data. If it detects any errors, these will be displayed for correction prior to the upload. Data may be edited onscreen, then the user must ask the system to validate the data again. Each expandable accordion in the Edit screen shows if any errors exist in the .csv upload file, and how many of each.
Accordions with a green tick do not have any errors. Accordions with a red tick contains errors which need to be corrected.
Each accordion should be expanded to correct the errors. In screenshot above, we have got an invalid phone number that needs to be fixed. Simply click on the cell and type in the correct number.
Note that fixing errors on screen does not correct the source data. Consider whether changes must also be made to the source data in the import file.
Once you are happy with the data please click on VALIDATE option at the top right section and then hit Next.
The rest of below steps are similar to our none stand-alone interview function, There will be references to those documents in each of the steps below.

The knowledge base documents referenced in this document will contain points that may reference users to the timetable file "etz" or syncing the timetable file. Please do ignore those points as for stand-alone interviews the syncing of timetable file "etz" or entering the data in timetable file "etz" is not applicable. The stand-alone Interview version require your own workbook sheet that needs to be uploaded as mentioned in step 1 upload.
3. Details
Please refer to our user guide on Details screen. Click here.
4. Rooms
For Face-to-face and Hybrid events, interviews may be held in one large space, such as the Hall, or in class rooms. Administrators can assign teachers to particular rooms or allow the 'Generate schedule' function to assign rooms (if using Timetabling mode).
If your event is not using single large space such as Hall but instead wishes to create more rooms, you have the following two options to create rooms:
- Create Rooms within the Rooms screen: You can click on Create room option and type your room and hit Save
- Import rooms in bulk: If you require to import several rooms in bulk, please go to Admin > Rooms > and click on Import rooms and upload your csv sheet with the list of rooms. Make sure you are following the format as displayed within the import screen.
For the rest of room grouping in areas please refer to our Rooms user guide here.
5. Teachers
Please refer to our user guide on Teachers screen. Click here.
6. Students
Please refer to our user guide on Students screen. Click here.
7. Classes
Please refer to our user guide on Classes screen. Click here
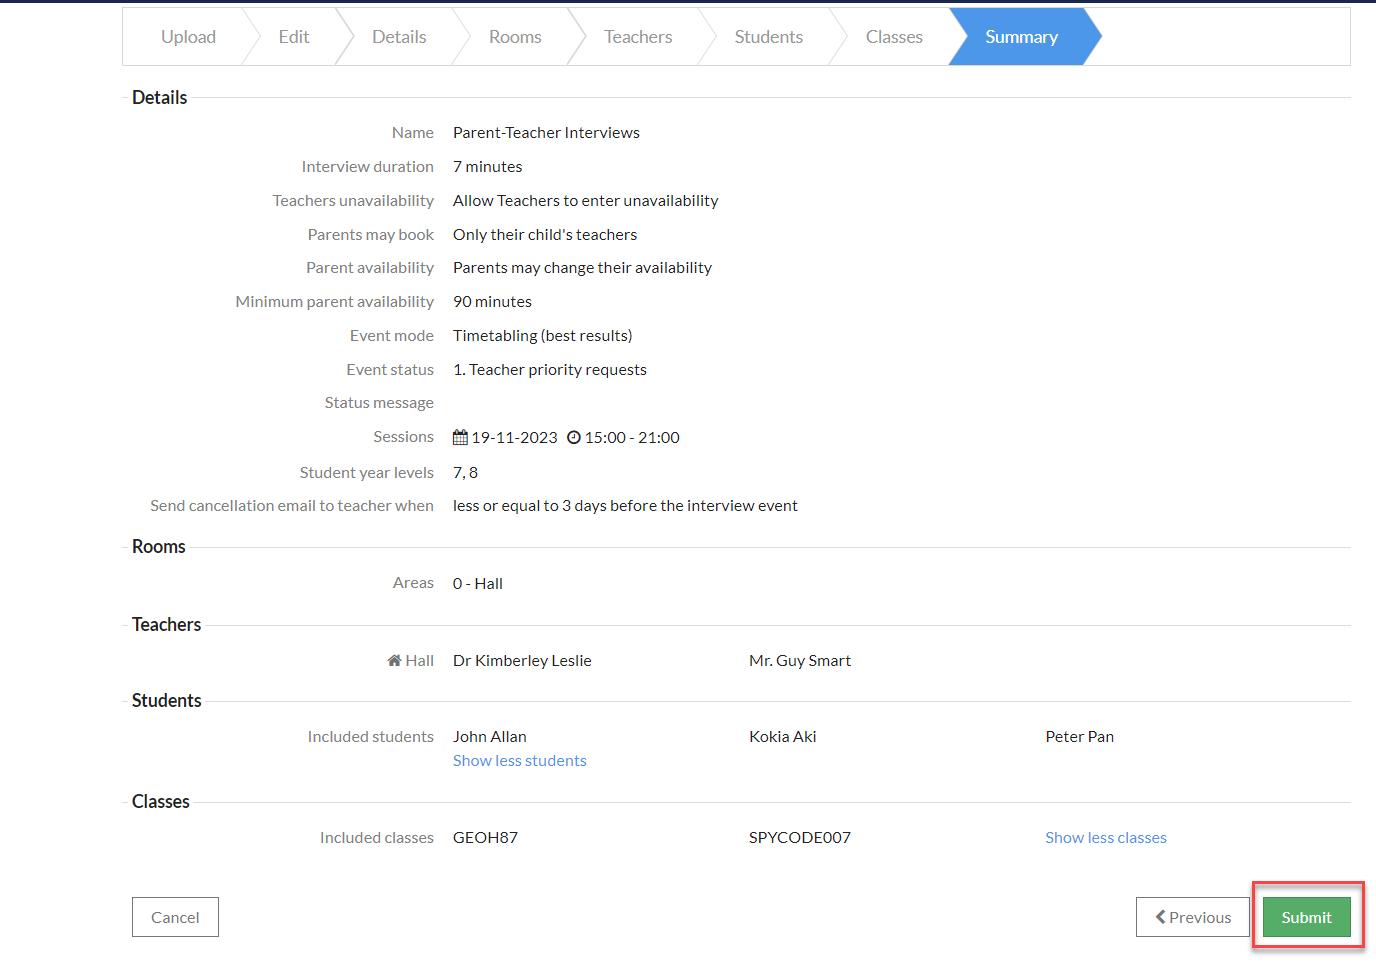
8. Summary
The summary screen will display the overview of your event setup, please check the overview and click on Submit.
Step 2 - Upload and manage Family data
Once the data has been imported through the upload step, Interview administrator can always check their family data under Admin > Family data , Please do not use the import functionality option through family data screen. If you would like to update your existing family data in bulk, please re-upload your updated event data as per the Step 3 below. You can edit and update your individual family data if you wish to.
Do we need to talk about the whole family upload option in family screen or we should hide that for stand alone schools and instead advise them to always import their family through the single event workbook at initial stage.
Step 3 - Updating existing Event with new data
If the user require to update your existing event with new changes such as additional teachers, students, parents then please click on Edit icon against the event and go to the Upload screen. Upload your updated workbook and go through the validation check and submit the event. This process will bring and update your current event data. Your data will not be overwritten or resetted, only new information will be added to the event.


Further reading
- Event Management
- Event Status
- Communicating with Teachers and Families
- Teacher or Family Login View
- Interview Reports
Note: The knowledge base documents referenced in this document will contain points that may reference users to the timetable file "etz" or syncing the timetable file. Please do ingore those points as for stand-alone interviews the syncing of timetable file "etz" or entering the data in timetable file "etz" is not applicable. The stand-alone Interview version require your own workbook sheet that needs to be uploaded as mentioned in step 1 upload.
Was this article helpful?
That’s Great!
Thank you for your feedback
Sorry! We couldn't be helpful
Thank you for your feedback
Feedback sent
We appreciate your effort and will try to fix the article