Integrating Tes Timetable and SIMS Single Grid
Introduction
Tes Timetable syncs directly to your school SIMS database. It’s important to note that SIMS struggles to deal with significant structural changes and therefore we recommend that you don’t attempt to sync your Tes Timetable file until it is complete.
Please note we understand that many SIMS schools are now been moved to SIMS Connected
And as such you will need to use a “3rd Party Connector” - that is a local workstation/server that has a VPN configured by ESS / Parent Pay Group on your network. E10 must be run on that machine to perform the synchronization.
Schools will be using more of the functionality in SIMS Next Gen, but at present the timetable is still synched via the “3rd Party Connector”. The route is E10 to 3rd Party Connector” to SIMS 7 SQL Database to SIMS Next Gen.
If you are using Multi-grid, please refer to the following document instead:
TES Timetable and SIMS Integration Multi-Grid – January 2026
Please read this document in full before attempting to sync your file to SIMS. It covers the following areas:
- Initiating the SIMS Sync
- Configuring the Sync
- Preparing your Tes Timetable .etz file for the SIMS Sync
- Publishing the Period Grid
- Publishing the Timetable for the first time into a new year
- Applying the Timetable
- Post-sync Checks
- Maintaining your Timetable and Resyncing
- Importing data from SIMS
- Using DERIVED and ALTCURRICULUM years
- Dealing with Registration Groups
Initiating the Sync
- In your .etz file go to File / Synchronise / Configure
- Select Sync at the top of the screen
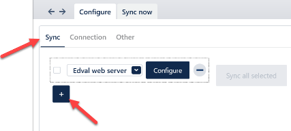
If you don’t see SIMS (direct) in the list on the screen, then click the plus button to add it
This is used if you host SIMS locally, remotely or with ESS via SIMS Connected.
- Click the Configure button
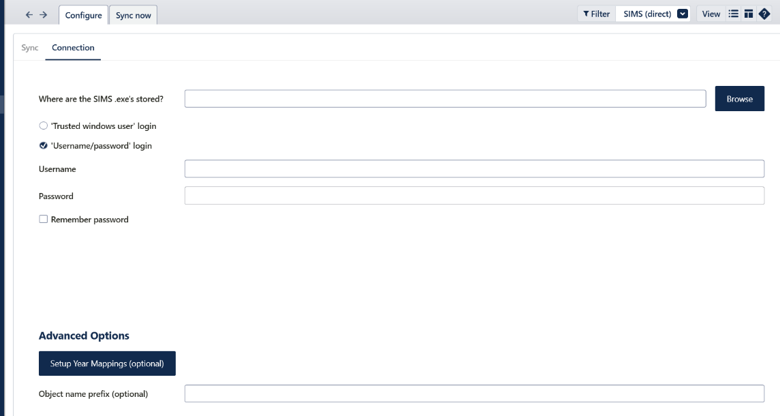
Where are the SIMS. exe’s stored? This can be browsed to by clicking the ‘Browse’ button but will be something like: “C:\Program Files (x86)\Capita\SIMS\SIMS .net”
If in doubt open the SIMS.ini file that can be found in the folder C:/Windows
This will contain something like this
[Setup]
SIMSDirectory=C:\SIMS
SIMSSetupsDirectory=C:\SIMS\Setups
SIMSDotNetDirectory=C:\PROGRA~2\SIMS\SIMS~1.NET
Folder=SIMS Applications
It is the SIMSDOTNETDIRECTORY that is required.
The Username and password is the SIMS credentials of a SIMS User that has at least “timetable” and “curriculum manager” rights in SIMS / System Manager.
Advanced Options.
If the names of the years in your files do not match your National Curriculum years in SIMS then click ‘Setup Year Mappings’ to identify these.
It is not necessary to map the Meetings year or indeed any year which does not contain National Curriculum classes.
Multiple Mappings
It is now possible to map multiple years in Tes Timetable onto one year in SIMS. This may be useful if some year groups are divided into two across different campuses or you have separate years set up in Tes Timetable for IB and A level courses.
The “Object name Prefix (optional)” can be used when downloading a version of the timetable when the curriculum is starting early. Refer to the document for further information:
02-TesandSIMS-StartingthenewAcademicYearearly
Preparing your Tes Timetable .etz file for the Sync
SIMS has very specific rules and criteria to ensure that your file will sync successfully. It is important to go through each of the following checks to prevent problems later.
Health Check
From the Tes Timetable home screen, the Health Check now shows potential errors/omissions which could prevent your file from syncing correctly
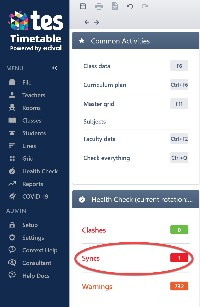
To view these errors go to Health Check > Syncs
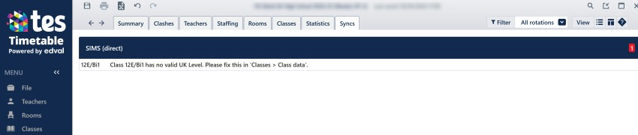
Resolve all errors before proceeding. Please contact us if you have difficulty resolving any issues.
The main causes for errors in the sync are
1) Class **** has no valid UK Level. Please fix this in 'Classes > Class data>'

The column UK Level MUST be populated the valid codes, please note it is case sensitive. The supplied document “Current UK Levels for use by E10 when exporting to SIMS December 2025” provides the full list of codes used by SIMS. (This equates to the Levels in Nova T).
2) Class **** has no SIMS Subject. Please fix this in 'Classes > Class data'

In this case the Official Course column is empty, this case it should be "En".
3) Course En is missing a description. Please fix this in 'Setup > Subjects > Official Course data".
To access the Official Course Data push the black box on the right side of the screen,

The screen below a description for En must be entered
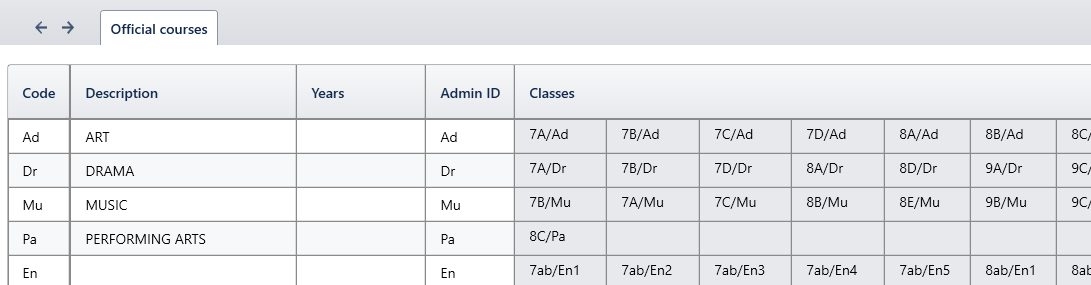
Ensure that every course has a description that has classes linked to the code.
Note: that the description itself is unimportant, it is simply a requirement from SIMS that this field is not blank.
4) "# 10a/bi1+1" Curriculum plan object name should be 10 character or less: # 10a/bi1+1"
All blocks in the Curriculum Plan should be clearly labelled to facilitate easier Curriculum Assignments in SIMS. Labelling these at a later stage can sometimes be problematic and therefore we recommend you spend time checking these prior to the initial sync
Classes > Curriculum Plan
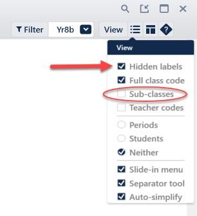
View > Show Hidden Labels (Make sure that Sub-classes are unticked at this stage.)
Everything you see on screen now will appear in SIMS and any untidy labels should be corrected at this stage.
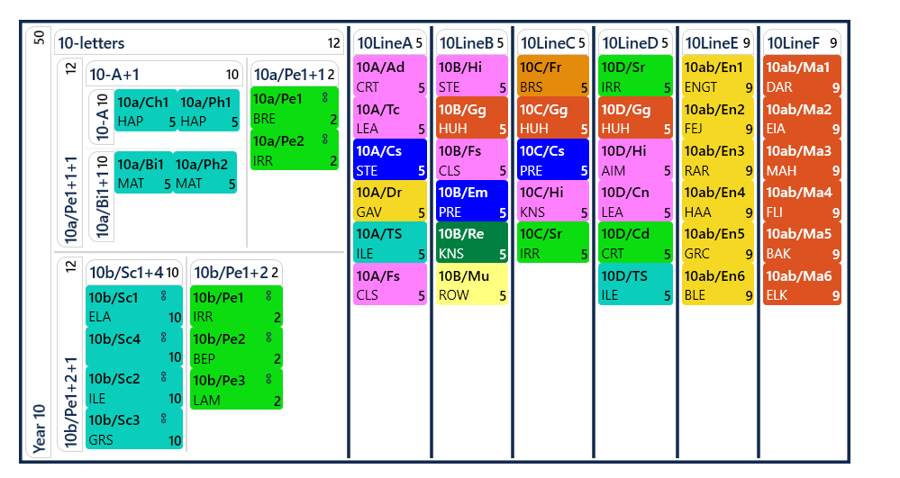
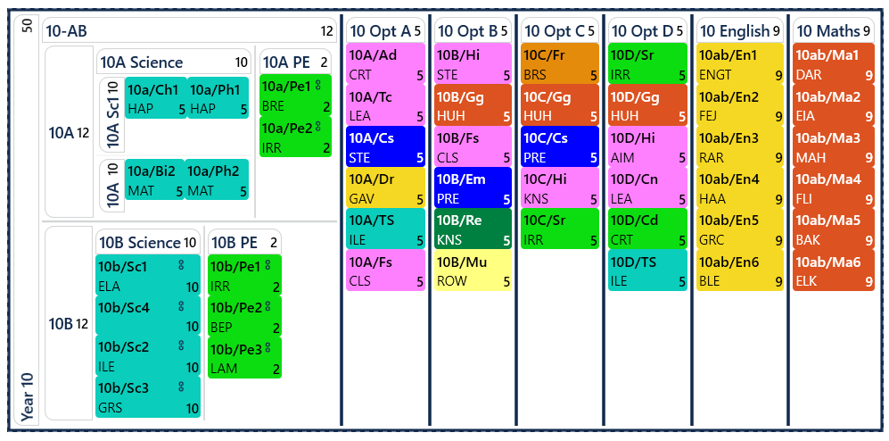
Note: There are two types of labels which appear in the curriculum plan: those to the left of an object and those above an object. SIMS requires that labels to the left of an object should have a maximum of 10 characters.
It could be changed to look something like this
5) "****" Lead Teacher cannot be assigned to a class with a TeacherPref None

6) "****" Class requires a Lead Teacher

Both these relate to sub-classes and their MUST be no red boxes in the Lead Teacher Level, the teacher who will have responsibility for running the course should be set as the lead teacher as in this example.

All sub classes MUST have a lead teacher, they can not be shared. In SIMS this is the teacher that will own the Assessment Marksheets and Registers.
DO NOT CHANGE THE LABELS AFTER THE FIRST EXPORT or you will need to re-allocate students to classes.
- Filler periods
If you have used Filler periods to support your structure, then it is usually not desirable to export these to SIMS. Enter the letter N in the Exportable column if you wish to prevent this.

AT THIS POINT YOU WILL NEED TO EMAIL YOUR FILE TO US BEFORE YOU SYNC FOR THE FIRST TIME
Please email edval-timetable.support@tes.com and attach a copy of your Tes Timetable file.
We will check your file and return it to you unlocked and ready for sync.
Publishing the Period Grid
If you are doing a synchronisation for the first time in a new academic year, then you MUST create the academic year in SIMS before running a sync from E10.
If your period grid structure has changed in the past year, then you will need to publish the period grid before publishing the timetable. This also applies if any of the periods have changed from teaching to non-teaching or vice-versa. Please check your period grid carefully in Setup > Grid Structure to ensure all timings are correct before syncing.
If your connect.ini is set up to access more than one SIMS database log in to the SIMS that is going to receive the timetable first and then publish the Grid.
ALWAYS TAKE A BACK UP OF SIMS BEFORE PUBLISHING THE PERIOD GRID
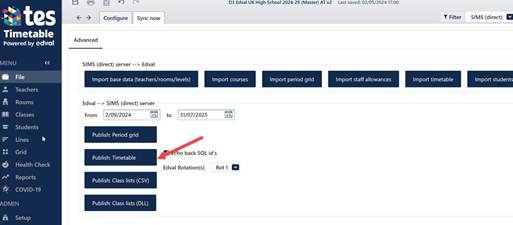
When you are ready to sync the period grid (equivalent to Nova's Data / Export timetable Cycle to SQL...) go to:
- File > Synchronise > Sync now.
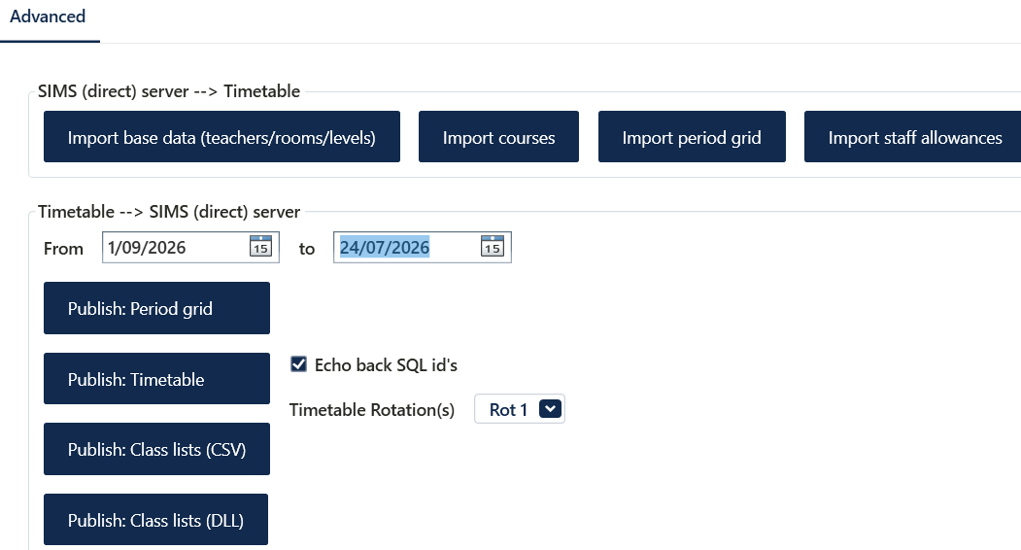
- Provide the correct dates for the next academic year and click Publish: Period grid.
We would advise using the first school day in the new academic year including any Inset day to the last teaching day in the school year AND use this end date for all future transfers. If the school has a 6th form the end date MUST be on or before 31st July.
Please note
- The grid MUST be downloaded once per academic year even if there are no changes.
- Publishing a modified Grid mid-year is not encouraged and the school may loose future cover arrangements or attendance Marks
There are two warning messages that can pop up.
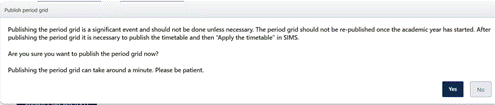
- If you are Ok to continue, click the YES button.
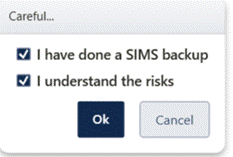
- Click the two tick boxes to confirm the actions and then click OK
You will see two windows, screen one that says publishing the Grid and a mostly black pop-up, please wait and it will close automatically when the Period Grid transfer has finished.
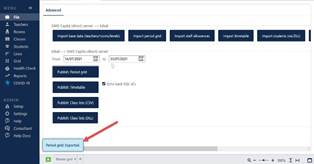
It is possible that some schools may receive a message saying, “Database timed out”. If this happens then Publishing the period grid for a second time should rectify the issue.
Publishing the Timetable
Once the period grid has been published to SIMS you can now publish the timetable.
ALWAYS TAKE A BACK UP OF SIMS BEFORE PUBLISHING THE TIMETABLE FOR THE FIRST TIME
- Once again check that the dates are correct and click Publish Timetable
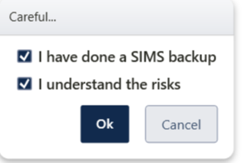
- Tick the two boxes and click OK
If you are presented with the unknown teacher code
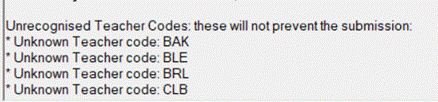
The lack of teacher codes will NOT prevent the transfer, those staff will be missing timetables etc: A similar message will appear if room codes are not found.
You will need to add those teachers to Manage Classroom Staff in SIMS.
Focus / Person / Manage Classroom Staff
Important: The new staff need to have been added to the staff personell in SIMS with a start date.
If a staff member has changed name/staff code, then ensure the new code is used in E10 before transfer.
The route in SIMS that should be used to create new rooms is Focus / School / Rooms.
The following examples of error messages both indicate that you have omitted to publish the period grid first, remember the grid MUST be published once in each academic year.
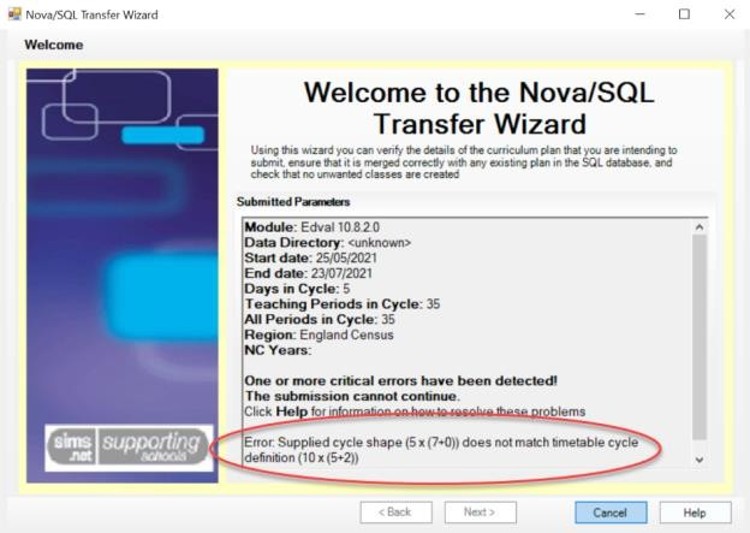
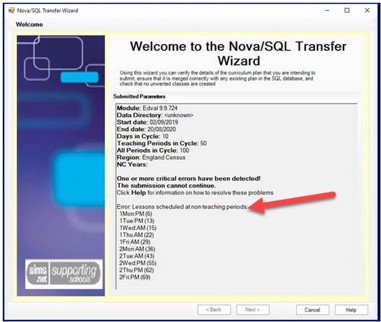
When running the publish timetable you might see the following
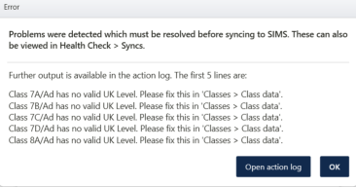
This indicates that you have not added valid codes into the UK Level in the class data.
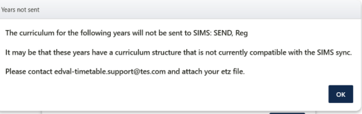
This means there are some year levels that do not exist in SIMS, the only valid year levels that are not mapped to an NC year are DERIVED, ALTCURRICULUM, Intervention and Meetings
***IMPORTANT***
When publishing for the first time it is expected that all elements will be “unlinked”. This will be shown here. Check the number of bands and blocks.
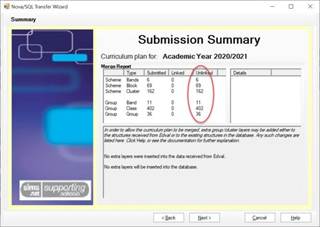
And the following screen (with the grey box on the right) as below will demonstrate that no previous curriculum structure exists in SIMS for this new academic year.
It is very important to check the structure, is this the structure you want to send through to SIMS?
If you see unexpected curriculum names here, then cancel the sync and contact edval-timetable.support@tes.com for advice.
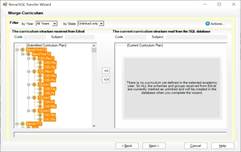
- Click next
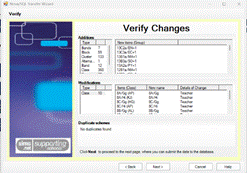
- Click Next
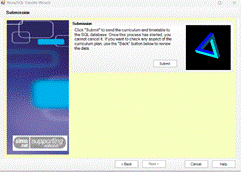
- Click Submit, this can take some time.
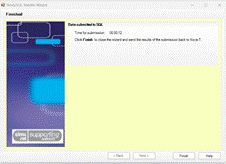
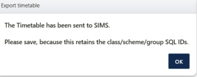
- Click Finish and this pop up indicates the sync is complete.
Applying the Timetable in SIMS
Once it has been synced to SIMS, you need to “Apply the Timetable”. Full details on this are contained in SIMS documentation for your End of Year Procedures.
However, we have included a brief outline here for ease of use.
- Select the appropriate academic year by going to: Tools > Academic Management > Set academic year
- Now go to: Tools > Academic Management > Apply timetable, you will be prompted to log in again.
- Ensure the correct Cycle is selected in the top left corner. Then use the drop down in the bottom left corner to map the first day of the academic year to the correct timetable day. If you have a 1-week timetable there will usually be only one choice here. Click OK.
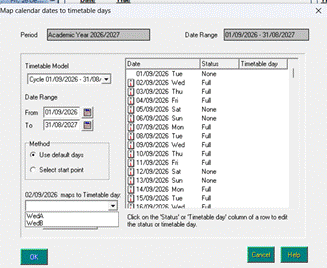
Depending on how you set up your registration periods you may also need to visit
Tools > Setups > Lesson Monitor Options > Lesson Monitor Setup
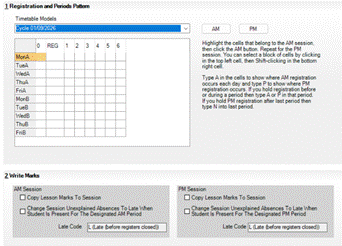
Note: We are aware of a quirk of SIMS that sometimes even if the timetable has already been applied in the summer, this sometimes needs to be repeated in September at the start of the academic year.
Post-sync Checks
Once you have applied the timetable there are several places you should check the success of the import. It is import that you do not start working on assigning students to classes until you are happy with the timetable and the SIMS import. Otherwise, if the curriculum structure is changed significantly, work completed in SIMS may be lost.
Check 1: Teacher Timetables
Reports / Timetables / Teacher timetable
Change the date to the new academic year and click refresh.
Select a teacher and click OK
Check their timetable is appearing correctly, including registration periods, meetings, PPA and Twilight periods. You may need to select “Include non-teaching periods” to ensure everything is displayed.
Check 2: Take Register
Click on the take register icon 
Change the date to one in the new academic year and select a teacher of your choice. It may be useful to check that this information matches that seen when you looked at a teacher timetable in Check 1
Check 3: Year/Band Timetable
Reports / Timetables/ Year/ band timetable
Change the date to one in the new academic year and press refresh
Ensure all year groups are displayed
Choose one year group and click OK (Note that selecting an individual band on the right hand side compresses the timetable and therefore is not recommended when you want to check the timetable)
Check 4: Curriculum Assignments
Focus > School > Academic Structure > Curriculum Assignment by Scheme
Press Enter to view all the curriculum structures
Note that you should be in the relevant academic year. If you are not, then please go to
Tools > Academic Management > Set Academic Year
The scheme names in this screen directly relate to the labels in your Tes Timetable .etz in the Curriculum Plan screen.
You can change the labels now and resync the timetable to SIMS.
Maintaining your timetable and resyncing
During the academic year it is normal to expect to make regular timetable changes, swapping teachers and rooms etc. After making these changes in Tes Timetable you will need to sync the timetable to SIMS again.
Note: Publishing the period grid is a significant event and SIMS recommend that this should not be done again once the academic year has started. If you need to change the cycle mid-year please consult your SIMS support company.
Once again check that the dates are correct (NEVER USE A START DATE IN THE PAST) and click Publish Timetable
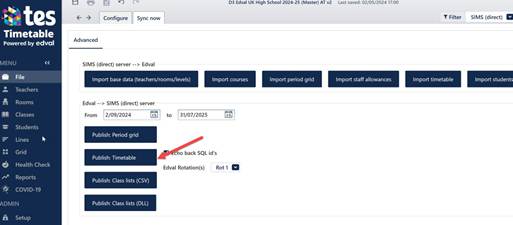
In these situations, it is important to ensure that the curriculum matching wizard displays only objects that you expect to see.
For example, when a new class is added this can be seen on the submission summary and subsequent screens as being the only unlinked item:
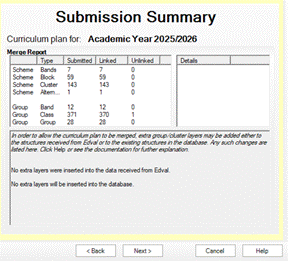
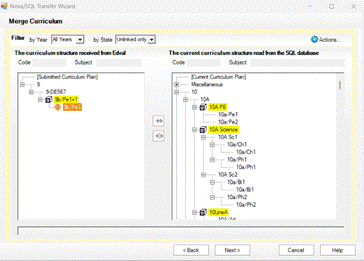
If you see unexpected numbers of unlinked items here, then cancel the sync and contact edval-timetable.support@tes.com for advice.
Note: changes to teachers and/or rooms on existing classes will not appear in these two screens as these are not structural changes.
IMPORTING DATA from SIMS into E10
You can import data into E10 using csv files by going to Files / Import Data / etc.
This is useful if you want to import a particular year group for Lines etc.
It is not possible to pull data directly into E10 from SIMS.
Using a DERIVED year
Some schools will use a DERIVED year in SIMS, typically for Vertical Tutoring, Games or Enrichment activities. Please ensure you have read our guidance for using and syncing a DERIVED year. This can be accessed here:
https://help.tes.com/support/solutions/articles/75000151677-04-tes-sims-using-a-derived-year-oct-26
If you are using ALTCURRICULUM year groups in your file, please ensure you have read our guidance here:
https://help.tes.com/support/solutions/articles/75000151683-03-tes-sims-alternative-curriculum
Dealing with Registration Classes
This document describes the two ways of dealing with Registration Classes in E10
https://help.tes.com/support/solutions/articles/75000151678-01-tes-sims-setting-up-registration-classes-sept-26
Was this article helpful?
That’s Great!
Thank you for your feedback
Sorry! We couldn't be helpful
Thank you for your feedback
Feedback sent
We appreciate your effort and will try to fix the article